How to shoot macro photos
Macro photography really is an exciting genre to get into. But there is a lot of misinformation out there, and way too many options when it comes to taking close up photographs.

A jumping spider approximately 1-2mm across. It took a few hundred attempts to get this photo - but worth it when you get the shot!
There are quite a few definitions of what macro photography is, and I am going to cover most of them here. So, let’s get started!
‘Macro mode’

The ‘macro’ mode on a camera dial - what does it do?
Most beginner-focused cameras come with a macro setting on the mode dial, and twinned with that some kit lenses will sport the macro flower symbol on them to suggest that they have macro capabilities. I would describe them as having close focus capabilities, rather than being a true macro lens - as they do not magnify anything beyond what the human eye can see and most importantly they don’t meet the 1:1 reproduction requirement. This quite simply means that a 35mm size object will fill the image on a full frame 35mm camera, therefore 1:1 representation. If your 35mm object is smaller on the frame then it is less that true macro. Here is an image to explain the situation.

A sample image of a ruler at the lens’ closest focus distance - showing a 35mm object (a ruler) filling the frame, therefore a 1:1 reproduction of the object on the sensor.
Another variable is of course sensor size. Many cameras have a cropped sensor and this will have an influence upon the apparent magnification. The below sample image was the exact same scene and same lens, taken with a cropped sensor Canon (1.6x) and if we do some basic maths of dividing a 35mm sensor by 1.6 you get close to 22mm. Ta da! With the same scene and the same 100mm macro lens we can now fill the frame with a 22mm object, BUT this is still a 1:1 reproduction of the object on the sensor. Make sense?

Even though the cropped sensor gets a larger scale object filling the frame, this is still a 1:1 reproduction.
Taking a step back, I mentioned that some lenses sport the ‘macro’ tag on them, but in reality they are not. See below an example of a Canon 24-105mm that is clearly labelled as a macro lens, however looking at the below image it is far from close up.


The not so macro capabilities of the Canon 24-105mm L series lens. Shot at 105mm at the lens’ closest focus distance.
That’s not to say that you can’t get great images using a 24-105mm lens, or any other entry level equipment, but for the purposes of talking about macro photography we need to get closer.
Extension tubes
The most cost effective way of getting closer, or having your object appear larger in your image, is to buy some extension tubes. These are cheap plastic tubes with metal connectors that are specific to your camera mount. There is no need to spend a lot of money on high quality extension tubes, because they have no influence upon the optical quality of your images, as there is just air inside the rings. More expensive versions may allow for autofocus and better build quality, but as an entry into macro photography I would say get a cheap set. These come in different ‘strengths’, the larger the spacing the great the magnification. Kind of.

This is the same 24-105mm lens with extension tubes attached this time, achieving a 1:1 reproduction and a genuine macro image.

Kenko extension tubes come in a set of three. I have stacked them here so that you can see them individually.
Extension tubes don’t actually increase the magnification of the image, they allow your lenses to focus closer. These are ideal for static objects, but less so if you are trying to photograph wildlife, as you have to get much closer and you will inevitably scare it off or maybe even bump into it with the lens element! Extension tubes will work with any lens, you will have to experiment to see which of your existing lenses work well.
Close-up filters

Image courtesy of Nisi filters
Here is another option, which screw onto the front of your existing lens and it resembles a magnifying glass. This will have an influence upon the optical quality of your images, and if you do invest in these you should read reviews to see which ones work well. Due to the science of magnifying glass however, this will require you to get close to your subject again and I would personally opt for extension tubes as they will not degrade the quality of your images.
Dedicated macro lens

My much loved Canon 100mm L Macro.
Just to state the obvious, if you invest in a macro lens, it doesn’t just do macro - they often make excellent portrait lenses, especially since they are prime lenses. Macro lenses vary in focal length, I own the Canon RF 35mm Macro lens, and also the Canon 100L Macro. Canon also make an RF 85mm Macro which has 1:2 reproduction. All of these lenses are excellent, but the 100mm lens will allow you to keep your distance from your subject, if you are shooting wildlife, it is also much easier to create out of focus (less distracting) backgrounds. We will cover this in more detail below.

The images you can expect from a 35mm macro lens


The 100mm macro image again for comparison.

If you add an extension tube to the 100mm macro you will get double life size images.
Which focal length should I get?
When choosing a dedicated macro lens, consider what you intend on shooting. The longer the focal length, the more distance you can keep between you and your subject - if that is an important consideration. A wider lens, such as the 35mm is a great general purpose lens, as well as a great focal length for detailed shots and product photography. Most are around the 90-105mm range, and don’t forget to look at third party lenses, such as Sigma. Nikon actually make a 200mm macro lens, which would be even better if you are in the Nikon eco-system. Take into consideration that if you have a cropped sensor camera you will also get a greater reach, which is ideal for wildlife, but you might sacrifice lens sharpness, low light performance and a change in depth of field by using a smaller sensor. Depending upon the equipment you are using, you may be better off cropping a full frame image than using a cropped sensor camera, as full frame lenses perform better on full frame cameras.

How about stabilisation?
As with other genres of photography, when you are using longer lenses you are more likely to encounter vibrations and shake. This is also applicable to macro photography, especially when you get really close to your subject. You will be resting your elbows on your lawn, trying to focus on a ladybird - you adjust your position and all of a sudden you have completely reframed your shot. Where did the ladybird go? Do yourself a favour and get a lens with stabilisation, you will thank yourself for it later.

The Canon 100mm Macro lens offers 4 stops of stabilisation, allowing slower shutter speeds hand held
Manual focus?
If you don’t have a massive budget, but you still want excellent results and you are willing to work harder for it; then you could opt for a 100mm macro lens from companies such as Samyang. I say work harder for it because they are manual focus lenses. I haven’t tested them, but their prime lenses get great reviews and they are a fraction of the price. If you are buying the lens purely for close up 1:1 photography then you will spend most of your time in manual focus anyway. But as I said earlier, when it comes to shooting portraits or product photography etc I would always want to have autofocus on the lens. But at least you have the choice. Laowa have released a 100mm macro lens which has a 2:1 reproduction and Canon’s latest RF 100mm macro f2.8L has a 1.4:1 reproduction, but this is autofocus and very pricey.

Specialist lenses
Beyond 1:1 reproduction starts to get into the specialist category. I haven’t used it and can’t justify spending the money on it, considering I don’t specialise in macro and I already own a 100mm macro lens. But if you want the best tool for the job, then Canon make the MP-E 65mm f2.8 Macro lens, which takes the magnification from 1-5x. Yes 5 times that of a dedicated macro lens. Reading reviews on the lens, users say that it is challenging, manual focus lens and of course the plane of focus is just a slither of what we get in ‘normal’ photography. But if you intend on really getting into macro, maybe this is the right tool for you?

Image courtesy of Canon
‘Extreme’ Macro
This is what I call it, its not a technical term, but I need to differentiate it from the 1:1 ratio that you get from a dedicated macro lens. And the good news is that it is cheap to achieve. You do this by reversing your lens and mounting it backwards onto your camera. Of course you have lost all of the intelligence that the connections from the lens usually transfers to the camera - everything is manual, you are on your own now! Your camera will say ‘00’ where the aperture is normally stated.

A Canon FD 28mm lens mounted backwards onto a DSLR.
To start with, the focal length of the lenses suitable for this is the opposite of what you might expect. Long lenses have less magnification, and wider lenses have more. But remember that a reversed lens is being supported by the filter thread on the front of it, I would therefore avoid reversing any heavy lenses. A nifty 50mm f1.8 is great for the task, but on the understanding that wider lenses gets you greater magnification I went in search of a 28mm. You can of course combine this with extension tubes for extra magnification (closer focusing).
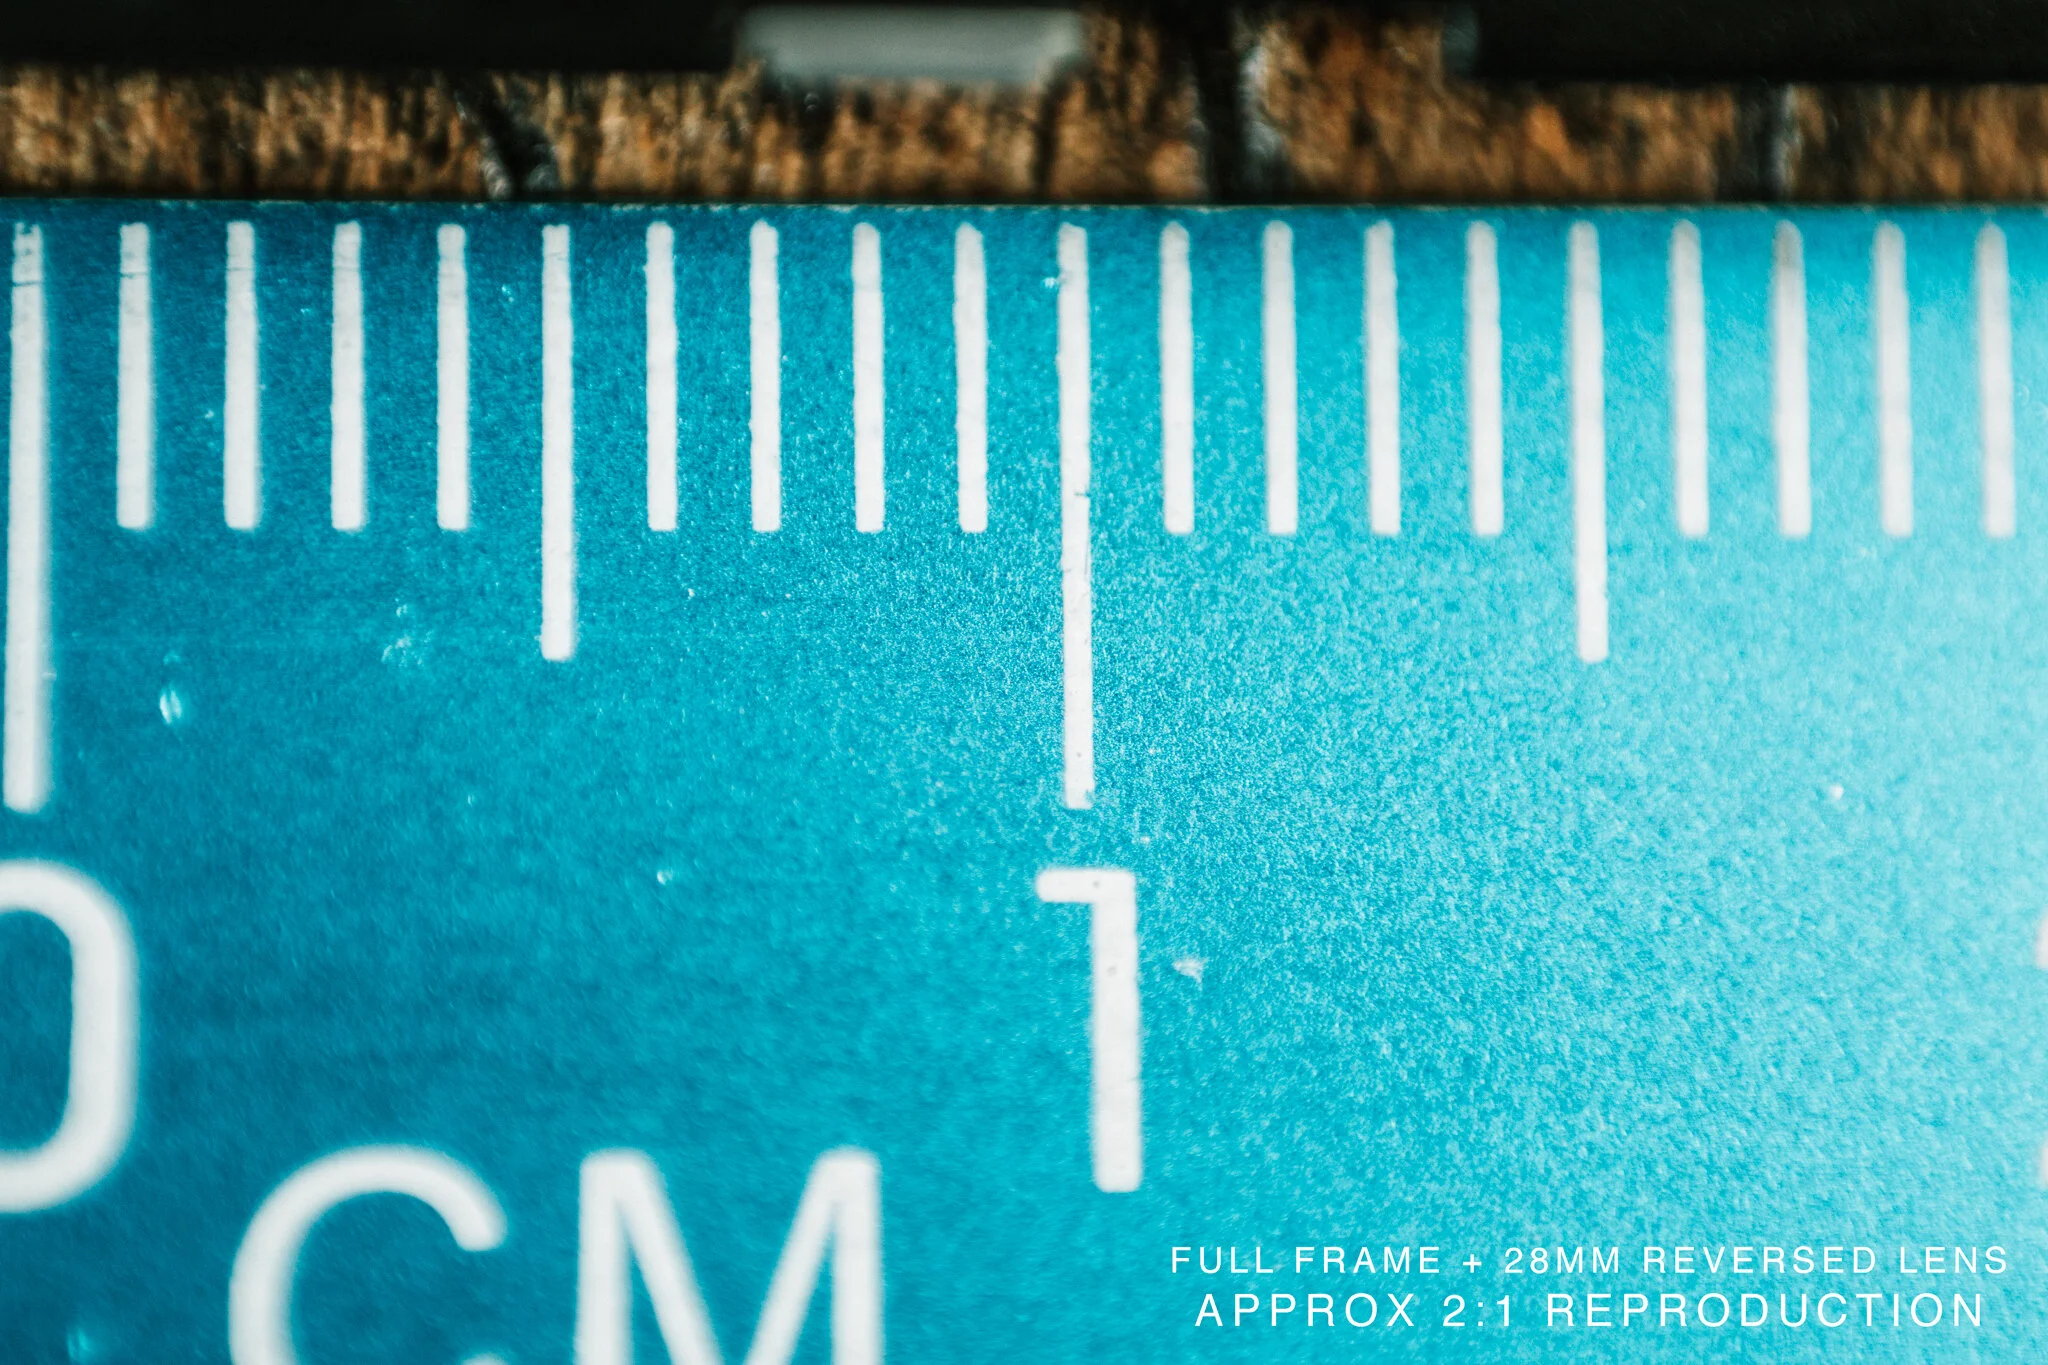
The sample image taken with the reversed lens on a full frame DSLR getting double the real life size on the sensor.

Add an extension tube to the reverse lens and all of a sudden you have an uber magnification of 4x real life. On the ruler you are filling up the frame with approx 8mm, but you only have a slither of the subject in focus. Let the challenge begin!
An added complication
When you detach a modern lens from a camera, some of them relax their aperture blades and therefore revert to an aperture that you didn’t want. The way to get around this is to buy an old lens that has manual aperture control, which in turn means that it will be cheap! I spent a whopping £28 on a Canon FD 28mm f2.8 lens, and that is what I have used to create all of my ‘extreme’ macro photographs. Although it is an old, cheap lens, it is a prime lens and when set to a medium aperture provides excellent results on a full frame camera.

What settings are good for macro?

A good rule of thumb is to be faster than the length of your lens. Since I shoot on a full frame camera at 100mm most of the time, I aim for 1/200 - which has the added safety net of in built stabilisation also. I change the ISO to suit the lighting conditions, to a limit. The aperture will very much depend upon the size of your subject, distance to your subject and the distance between the subject and background. As well as the ‘depth’ of your subject and how much of it you want in focus. You need to experiment, but generally you need f5.6-f8 to get even a small amount in focus at close range. If you shoot something close up at f2.8 then you will get a slither of your subject in focus. Small apertures, such as f16 may lose sharpness due to diffraction, so be careful with this, this isn’t really the solution to macro photography. Also, apertures and diffraction are amplified the closer you get. If the lighting is not great, then I will introduce some artificial light via a flash, discussed below. Most wildlife can be found out in the daytime however and the easiest option is to head out on an overcast day for soft diffused light over your subject. If you have strong harsh light then invest in a pop up diffuser which you will put between the sun and your subject. At high magnification levels autofocus is very hit and miss, you are better off switching to manual focus and rocking your body back and forward until your subjects eyes (or the focal point) is in focus.
How much of the image should be in focus?

The beginning of a water droplet freezing. I decided to focus on the frozen inners
As much as you want. But getting a large depth of field in macro photography is a challenge. The closer you get, the plane of focus gets smaller and smaller. A solution to this is to focus stack. Quite simply this is taking the same photograph at different points of focus and blending them all together in software afterwards. As mentioned earlier, it is often more effective to leave the the focus ring alone and move the camera back and forward to achieve multiple planes of focus. There are cameras that create in camera focus stacked images, but for the most flexibility the pros do so on the computer afterwards. The Canon RP, R6 and R5 all perform focus stacking options in the menu, I have the only Canon Mirrorless camera that doesn’t offer this function!!! Olympus and Panasonic cameras stack the images in camera, whereas Canon images still need to be stacked using software afterwards, which many choose Helicon Focus to stack the images. One challenge with focus stacking is that you get halos, as out of focus areas change in scale, and the software has to determine which elements to keep and which to discard when blending them all together. Some software is better than others!
The proper way of focus stacking is to use a focus rail which, to simplify it, is a camera mount on a ruler that you can move a millimetre at a time (or less) by cranking a knob or a handle. There are manual and automated focus rails, obviously the price goes up the easier you want your life to be!
Lighting is very important
Like any form of photography, lighting can make or break a photograph. But science is on your side with macro photography, because the quality of light you get is the relative size of the light source to your subject. If you are photographing a tiny jumping spider that measures 1-2mm, then even a small torch will be a large light source in comparison. That said, a larger diffused light source is still the best for shooting small subjects. I follow a macro specialist on social media called Thomas Shahan, and his work is incredible! And you will be pleased to know that he is using very basic equipment to create his images. He uses off camera flash with tissue paper to diffuse the light and because of the science of light - the results are great. Click here to see his website.

This jumping spider again - but since it has so many eyes you can see the catch-lights revealing the light source, which in this instance was a small soft box on the flash off camera.
Note that when you get really close up to insects you will see the catch lights in their eyes (sometime many!) revealing the light source that you used. If you use a macro ring flash then you will see that in the insects eyes - which does not look natural and you may want to avoid!
I use the KuangRen flash, because it has a bendy LED light, which helps focusing in low light, and it allows you to control the output of the left and the right independently. This sits on the hot shoe of the camera. If you own a Canon mirrorless M camera, then you will have the added option of their EF-M 35mm macro lens with has an LED ring light on the front of the lens! Yes please!
Without going into the technicalities, when using flash your shutter speed needs to be less than around 1/200th second (or your camera’s flash sync speed). If you want to know more about using flash then check out my post here.

The KuangRen macro flash resembling an insect in itself with its bend flash arms and the central focus light.
Using an optical viewfinder
Because the extreme macro images are created using a reversed lens, the optical viewfinder is now considerably darker than if the lens was wide open (as it always is before you press the shutter) and this does create challenges with focus and being able to see your subject altogether!

This wasp decided to land on my desk whilst I was working, so I set up the camera and the light reflecting off the glass provided a nice even tone to the subject.
My Canon EOS R didn’t particularly like having a lens reversed onto it, as the sensor is covered by protective shutters when there is no lens connected. You can see the problem here. For this reason I prefer to use my DSLR, and if I need assistance with focusing I use live view.
What shall I photograph now that I know the ropes?
Popular subjects for macro photography are flowers, insects (butterflies and dragonflies for example), detail product shots, bubbles, eyes, water droplets. These all work well at 1:1 reproduction. If you can get closer then you start to get into the realms of photographing smaller insects, jumping spiders, the head of a bumblebee, a single water droplet, or if you have them, snowflakes. If you want to get into photographing snowflakes then check out Dom Komerechka’s work here. It’s worth noting that all of the insects that I have photographed are alive, which makes it more challenging but more rewarding!

A close up of a bee’s head, revealing all of the detail in the eyes. Single shot with reverse lens.

A frozen bubble on the roof of my car. 100mm macro

A close encounter with bubbles!

Water droplets on a flower

I quickly set up this shot of single snow flake that landed on my glove before it melted entirely. Reverse lens with extension tubes.

Oil floating on the surface of water

Close up image of a flat bubble surface
I hope this has given you the foundations you need to start creating awesome macro images, and if you already knew how; inspired you to get out your macro gear and take some photos.
Video tutorial
If you prefer to absorb your learning through video, then once I have created my online tutorial I will post the link here.
Thanks for reading & watching!
Ben